Heads up (2026 update): This guide reflects the Android Gradle Plugin 7.x setup. Newer AGP versions prefer
flavorDimensions += "default"over the string form, and Xcode 15+ uses.xcschemeshared schemes by default. The core idea is unchanged; the specific snippets below may need a one-line tweak for AGP 8+ or Xcode 15+.
 Photo by AltumCode on Unsplash
What Are Flavors in Flutter?
Flavors in Flutter allow you to create multiple versions of your app with different configurations. Each flavor can have its own set of resources, environment variables, and dependencies. For example, you might want to create separate development, staging, and production builds of your app, each pointing to different API endpoints or using different sets of assets.
By using flavors, you can manage these variations in a clean and organized manner, reducing the risk of accidentally deploying a development build to production or vice versa.
Why Are Flavors Important?
Flavors are crucial when you need to maintain different versions of your app for various environments or use cases. Some common scenarios where flavors are beneficial include:
- Environment Management: Separate development, staging, and production environments.
- Multiple App Versions: Free and paid versions of the same app.
- Custom Branding: White-label apps for different clients with unique branding.
Using flavors helps streamline the development and deployment process, making it easier to maintain consistency across different app versions.
Step-by-Step Guide to Implementing Flavors in Flutter
Let’s dive into how to set up flavors in a Flutter project.
Step 1: Define Flavors in the build.gradle File (Android)
First, you’ll need to define your flavors in the android/app/build.gradle file. Locate the android directory and open the build.gradle file inside the app folder.
Add the following code under the android section:
android {
    ...

    flavorDimensions += "default"

    productFlavors {
        development {
            dimension "default"
            applicationIdSuffix ".dev"
        }
        staging {
            dimension "default"
            applicationIdSuffix ".staging"
        }
        production {
            dimension "default"
            applicationIdSuffix ".prod"
        }
    }
}
In this example, we’ve defined three flavors: development, staging, and production. Each flavor has a unique applicationIdSuffix , allowing you to differentiate between the builds.
- The name of the application for each build is located in resValue.
- If you specify a applicationIdSuffix instead of a applicationId, it is appended to the “base” application id.
Step 2: Configure Flavors in Xcode (iOS)
For iOS, flavors are configured using Xcode. Open your Flutter project in Xcode by navigating to ios/Runner.xcworkspace.
- Create Schemes: Go to
Product > Scheme > New Schemeand create a new scheme for each flavor (e.g., Development, Staging, Production).
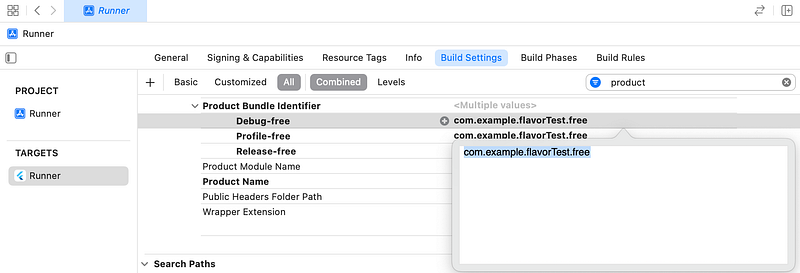
- Configure Build Settings: Select your project in the project navigator, then select the target. Go to
Build Settingsand find theProduct Bundle Identifier. Change it to match the corresponding flavor, e.g.,com.yourcompany.yourapp.devfor the development flavor.
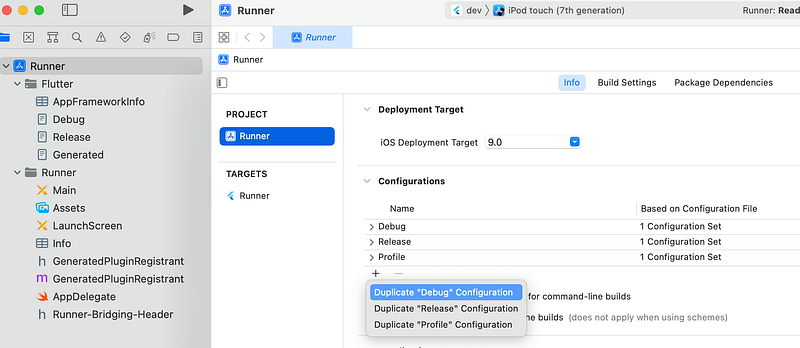
- Create Configurations: Go to
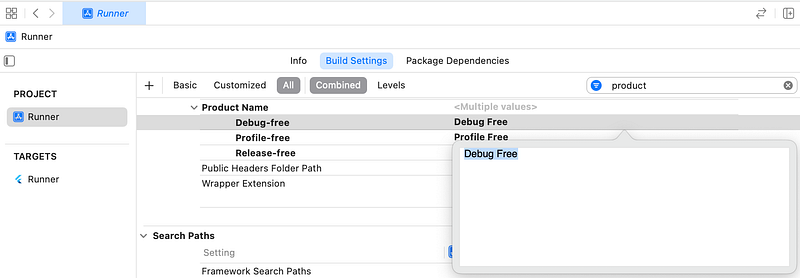
Infotab and create separate configurations for each flavor underConfigurations. Then, link each configuration to the corresponding scheme. - In the Build Settings, set the Product Name value to match each flavor. For example, add Debug Free.
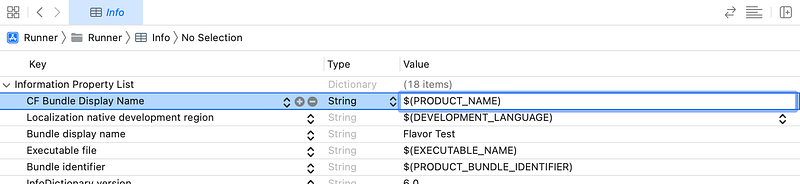
- Add the display name to Info.plist. Update the Bundle Display Name value to
$(PRODUCT_NAME).
Now you have set up your flavor by making a free scheme in Xcode and setting the build configurations for that scheme.
Step 3: Use Flavors in Dart Code
You can now use the flavors in your Dart code to load different configurations or assets based on the current flavor.
Here’s an example of how to determine the current flavor:
import 'package:flutter/foundation.dart';

void main() {
  // Retrieve the flavor from environment variables
  const String flavor = String.fromEnvironment('FLAVOR');

  // Ensure the flavor is not null
  assert(flavor != null, 'FLAVOR environment variable is missing.');

  runApp(MyApp(flavor: flavor));
}

class MyApp extends StatelessWidget {
  final String flavor;

  MyApp({required this.flavor});

  @override
  Widget build(BuildContext context) {
    return MaterialApp(
      title: 'Flutter Flavors',
      home: Scaffold(
        appBar: AppBar(
          title: Text('Flavor: $flavor'),
        ),
        body: Center(
          child: Text('Current Flavor: $flavor'),
        ),
      ),
    );
  }
}
In this example, we use String.fromEnvironment('FLAVOR') to get the current flavor and pass it to the MyApp widget, displaying the flavor on the screen.
Step 4: Configure VS Code for Flavors
To make it easier to run different flavors in your development environment, you can configure Visual Studio Code using the launch.json file. Here’s a sample configuration:
{
  "version": "0.2.0",
  "configurations": [
    {
      "name": "Flutter Development",
      "request": "launch",
      "type": "dart",
      "program": "lib/main.dart",
      "args": [
        "--flavor",
        "development",
        "--dart-define=FLAVOR=development"
      ]
    },
    {
      "name": "Flutter Staging",
      "request": "launch",
      "type": "dart",
      "program": "lib/main.dart",
      "args": [
        "--flavor",
        "staging",
        "--dart-define=FLAVOR=staging"
      ]
    },
    {
      "name": "Flutter Production",
      "request": "launch",
      "type": "dart",
      "program": "lib/main.dart",
      "args": [
        "--flavor",
        "production",
        "--dart-define=FLAVOR=production"
      ]
    }
  ]
}
Running the Flavors
To run a specific flavor using the configurations defined in the launch.json:
- Open the Debug panel in Visual Studio Code.
- Select the desired configuration (e.g., “Flutter Development,” “Flutter Staging,” or “Flutter Production”).
- Click the “Start Debugging” button or press
F5.
This setup will load the corresponding flavor and pass the necessary environment variable to your Flutter app.
Common Issues and Troubleshooting Tips
1. MissingapplicationIdSuffix: Ensure that you've added applicationIdSuffix for each flavor in the build.gradle file. This helps in distinguishing between different builds.
2. Incorrect Bundle Identifier in Xcode: Double-check that the Bundle Identifier in Xcode matches the one defined for each flavor. This is a common mistake that can lead to build failures.
3. Environment Variables Not Loading: Make sure that the environment variables are correctly defined and that you’re using the --dart-define flag when building the app.
4. Inconsistent Asset Loading: If you’re using different assets for each flavor, ensure that the assets are correctly organized in your pubspec.yaml file and that they are being referenced correctly in your code.
Conclusion
Flavors in Flutter provide a powerful way to manage multiple versions of your app, each with its own configuration. Whether you’re dealing with different environments, app versions, or custom branding, flavors can simplify your workflow and reduce the risk of errors. By following the steps outlined in this guide, you can easily set up and manage flavors in your Flutter project, making your development process more efficient and organized.
Happy coding!
By implementing flavors in your Flutter project, you’ll have greater control over how your app is built and deployed, allowing you to focus on what matters most: creating amazing experiences for your users. If you have any questions or run into issues, feel free to leave a comment below, and I’ll be happy to help!